一、背景
在上一篇文章中,我們使用Seata整合了SpringBoot,在這篇文章中我們使用Seata整合SpringCloud。同時有了上一篇文章的基礎,此處我們簡單實現。
二、項目結構
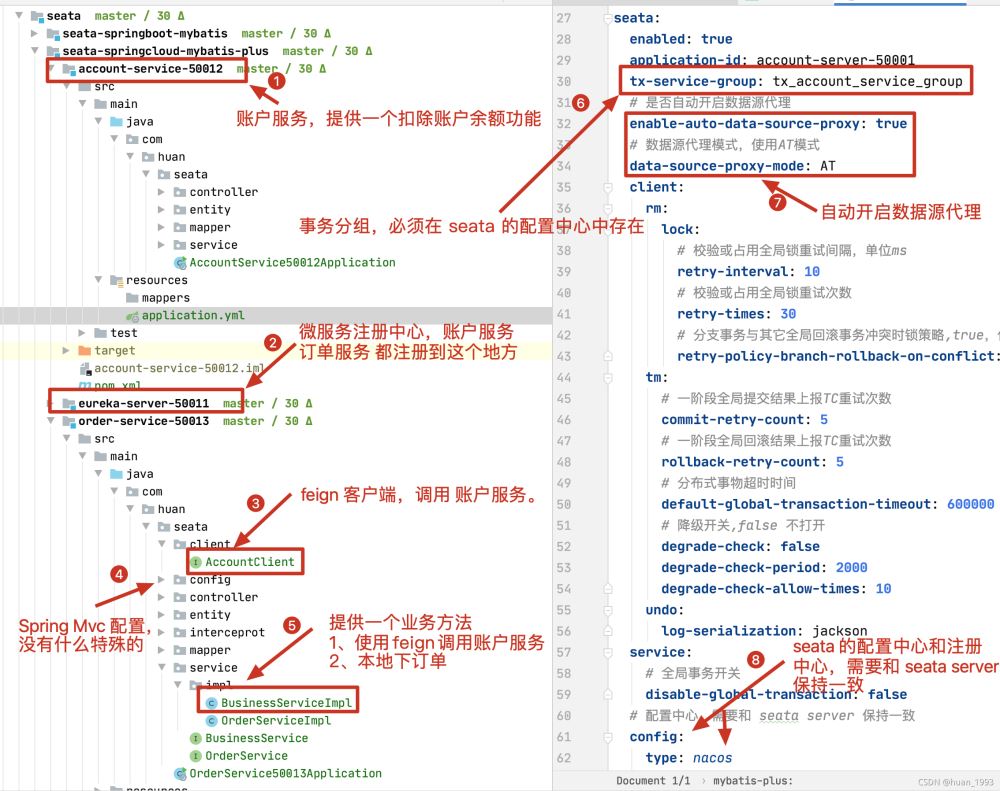
三、實現功能:
完成用戶下單操作,下單分為調用 賬戶服務 扣除余額,調用訂單服務創建訂單。

四、項目使用到的技術
Spring Cloud 、eureka、openfeign、seata 、nacos、druid、mybatis-plus
五、整合步驟
1、引入spring-cloud-starter-alibaba-seata jar包
<dependency>
    <groupId>com.alibaba.cloud</groupId>
    <artifactId>spring-cloud-starter-alibaba-seata</artifactId>
    <version>2021.1</version>
    <exclusions>
        <exclusion>
            <artifactId>seata-spring-boot-starter</artifactId>
            <groupId>io.seata</groupId>
        </exclusion>
    </exclusions>
</dependency>
<dependency>
    <groupId>io.seata</groupId>
    <artifactId>seata-spring-boot-starter</artifactId>
    <version>1.4.2</version>
</dependency>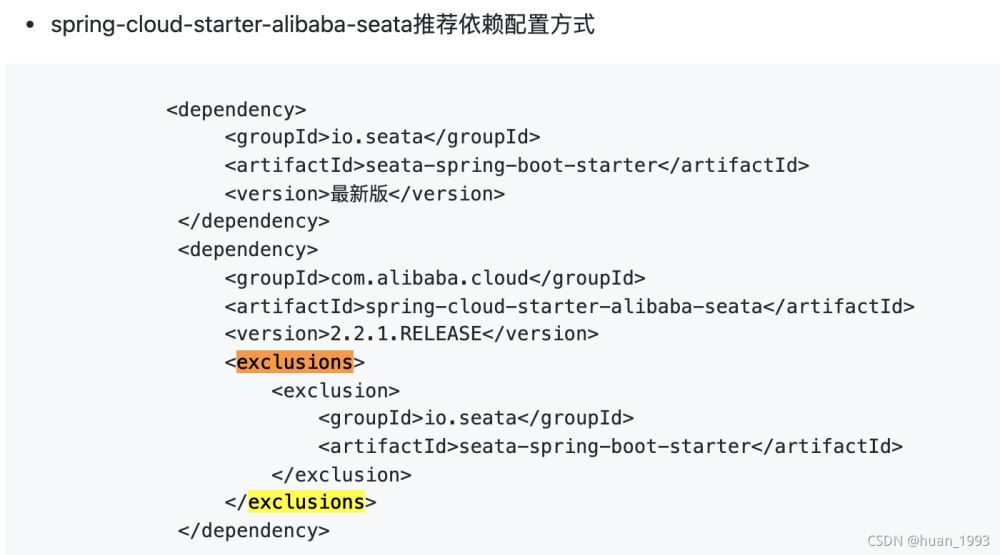
參考文檔: https://seata.io/zh-cn/docs/ops/deploy-guide-beginner.html
2、涉及到的業務庫操作
1、業務庫需要存在 undo_log 表
CREATE TABLE IF NOT EXISTS `undo_log`
(
    `branch_id`     BIGINT       NOT NULL COMMENT 'branch transaction id',
    `xid`           VARCHAR(128) NOT NULL COMMENT 'global transaction id',
    `context`       VARCHAR(128) NOT NULL COMMENT 'undo_log context,such as serialization',
    `rollback_info` LONGBLOB     NOT NULL COMMENT 'rollback info',
    `log_status`    INT(11)      NOT NULL COMMENT '0:normal status,1:defense status',
    `log_created`   DATETIME(6)  NOT NULL COMMENT 'create datetime',
    `log_modified`  DATETIME(6)  NOT NULL COMMENT 'modify datetime',
    UNIQUE KEY `ux_undo_log` (`xid`, `branch_id`)
) ENGINE = InnoDB COMMENT ='AT transaction mode undo table';
2、業務表主鍵
業務表中必須包含單列主鍵,如果存在多列主鍵,則目前只有mysql支持。
3、頁面中自動更新時間戳
業務表中最好不要自動更新時間戳,使用手動更新,更新數據,只更新用到的數據。
比如:
表中存在10個字段,當前業務只需要更新3個字段,此時我們更新3個字段即可,不要更新10個字段,如果update_time字段是默認更新的,則使用手動更新。
3、開啟數據源代理
1、自動配置數據源代理
seata:
  enabled: true
  # 是否自動開啟數據源代理
  enable-auto-data-source-proxy: true
  # 數據源代理模式,使用AT模式
  data-source-proxy-mode: AT
2、手動配置AT模式數據源代理
1、配置文件關閉自動數據源代理
seata:
  # 是否自動開啟數據源代理
  enable-auto-data-source-proxy: false
2、配置配置數據源
AT模式下返回的數據源一定需要是 DataSourceProxy
@Bean
    public DataSource dataSourceProxy() {
        // 某一個數據源
        XxxDataSource xxxDataSource = new XxxDataSource();
        // 設置數據源的各種配置屬性
        xxxDataSource.setXXX("");
        // 使用 DataSourceProxy 來包裝一下
        return new DataSourceProxy(xxxDataSource);
    }
4、傳遞 xid
在引入了 spring-cloud-starter-alibaba-seata 后,很多都已經實現了自動傳遞 xid 。同時在分布式事務結束后,需要清除xid的值。
默認實現了 feign、rest和web3種方式的 xid的傳遞。

5、事務分組和seata server對應上
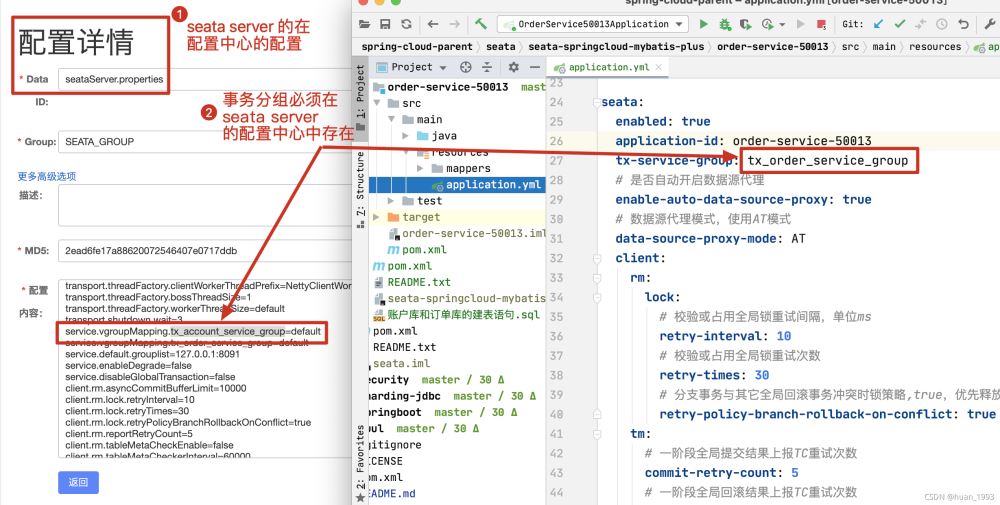
6、注冊中心和配置中心
應用程序中 seata 的配置中心和 注冊中心 需要和 seata server 的保持一致。

7、業務方法加上@GlobalTransactional 注解
在需要開啟分布式事務的方法上加入 @GlobalTransactional 注解,開啟分布式事務。
public class BusinessServiceImpl implements BusinessService {
    private final OrderService orderService;
    private final AccountClient accountClient;
    @Override
    // 開啟分布式事務
    @GlobalTransactional(rollbackFor = Exception.class)
    public void createAccountOrder(Integer accountId, Long amount, boolean hasException) {
        System.out.println("xid:" + RootContext.getXID());
        // 1、遠程扣減賬戶余額
        remoteDebit(accountId, amount);
        // 2、下訂單
        orderService.createOrder(accountId, amount);
        if (hasException) {
            throw new RuntimeException("發生了異常,分布式事物需要會滾");
        }
    }
    private void remoteDebit(Integer accountId, Long amount) {
        String result = accountClient.debit(accountId, amount);
        log.info("遠程扣減庫存結果:[{}]", result);
    }
}
六、演示
分布式事務發生異常,事務回滾

七、完整代碼
https://gitee.com/huan1993/spring-cloud-parent/tree/master/seata/seata-springcloud-mybatis-plus
八、參考文檔
1、新人文檔
2、seata常見問題
到此這篇關于springcloud整合seata的文章就介紹到這了,更多相關springcloud整合seata內容請搜索html5模板網以前的文章希望大家以后多多支持html5模板網!